
On my first days on Flickr I met a sweet girl from Brazil, Monica Gerard, and she taught me an amazing polymer clay technique - The Watercolor Mosaic. It was back in 2005. After I tried it I was fascinated by this technique and I made a tutorial in Hebrew. I'm very happy to share it with you now :) enjoy!

The Watercolor Mosaic Technique
This technique based on the use of transparent polymer clay, Fimo brand, combined with white and black color. Very easy method, but you need to know how to make a Skinner blend with three colors.
You will need:
Polymer Clay -
3 transparent colors
Black, White, Gold
A4 printer paper
Pasta machine
Roller
Cutters
Step 1
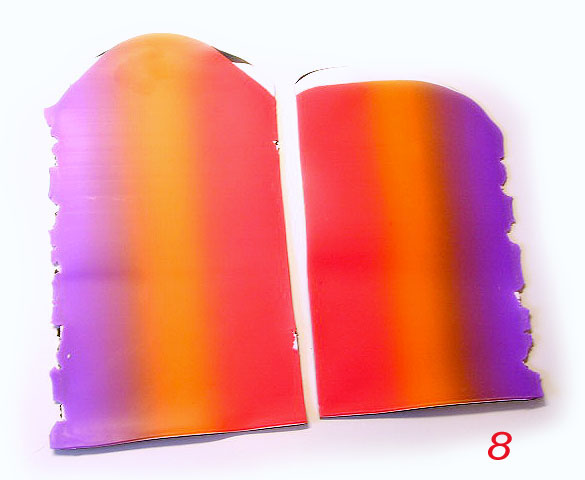
We will start with transparent clay.
Make a Skinner blend with 3 colors, a quarter of a package for each color.
Note that a new color is created between 2 color shades. Think about colors that will appear - they will be a part of the Skinner blend outcome.
Step 2
When the Skinner blend is done - finish it on the thickest setting of the pasta machine.
Step 3
Now over to the black and white - not transparent - the regular clay.
Three stripes to half of package from each color.
Step 4
Make equal size sheets that will match the size of the transparent Skinner blend colors; you will have to use for that a thinner setting.

Step 5
Here is the order to place the sheets:
Top - transparent Skinner blend
Middle - white
Bottom - black
Step 6
Here is a look from the side.
Step 7
Roll them all together with the thickest past machine setting.
Then roll it a second time with a thinner setting, I use no 4 in my pasta machine.
Divide the long sheet in to two shorter ones for more comfortable use.

Step 8
Now an important recommendation -
Now an important recommendation -
Place them for a whole day (or even for a few hours) on A4 printer paper, on their down black side only, to absorb the polymer grease - and this is because of the next step.
Step 9
Here is the gimmick -
Take one sheet, rip and tear it to unplanned pieces, they can be very small or big pieces, but do a variety of sizes.
When you cut it, the 2 lower layers - black & white - will appear, and this will create the "ripped" look .
Step 10
Preparing the surface -
Here I've used a quarter package of gold clay.
(Metallic color was recommended to me - if it's for a jewel).
Prepare a thick sheet - with a roller or with the thickest width of the pasta machine.
Covering vessels, tableware & dishes:
Carry on doing this from this step, like the explanation from the next steps.
You will not need the gold clay as a surface; the vessel will replace the surface.
Step 11
Start placing the torn pieces on the gold sheet; in the first layer you don’t have to cover all of its surface.
Step 12
Flatten the gold surfaces with the roller.
It will smooth the pieces and will stretch and expand them and the bottom surface too.

Step 13
In the second layering, it is better to use smaller torn pieces.
Add more pieces and scatter them a bit.
Step 14
Flatten again the gold surfaces with the roller.
This is optional - If needed, make a third layer with smaller pieces and roll it again.
Step 15
Now cut with a cutter the shape you want, for example a round pendant or magnets shapes.
Here I've cut out at heart, for an example.

Step 16

Beads can also be created with this technique. Make a scrap bead and cover it with little pieces, role it with your hands and continue with your own making bead techniques.

E n j o y :) ……and a big Royal Kiss from me !!! :))
Thank you! Beautiful tutorial; so well done! - Marlene
ReplyDeleteThis is beautiful! Thanks for the tutorial!!
ReplyDeleteMuchas gracias¡¡¡¡¡¡¡¡¡¡¡Bravo¡¡¡¡¡¡¡
ReplyDeletethank you for sharing , i will post your link on Facebook!
ReplyDeleteמקסים! תודה רונית
ReplyDeleteThank you for perfect tutorial. I will follow you :)
ReplyDeleteThank you all so much, glad you like it!!!
ReplyDeleteRonit!!! Such great surprise, and I really appreciated your comment <3 So kind of you. Thank you for share love and beauty!!! Love from Brazil (Monica)
ReplyDeleteDear Monica, Thank you so much dear friend :) Love from me to you :)
ReplyDeleteThanks so much, I like it!
ReplyDeleteThank you L. Love :) enjoy!!!!!
DeleteHello from Tennessee, USA. I have started to follow your blog. Looking forward to learning a lot.
ReplyDeleteBlessings to you Ronit....
Janice
Thank you Janice :) enjoy!!! :)
DeleteI'm so trying this today! It looks beautiful! Thank you for sharing!
ReplyDeleteThank you Maria Roe :) Enjoy !!!
DeleteHi there,
ReplyDeleteI have tried your technique as well and i loved it! I created a couple of pairs of earrings and a couple of pendants. Thank you for sharing this with us!!
Hello Kalilo, Thank you very much for your comment. I'm sure they are beautiful, enjoy creating!
DeleteRonit