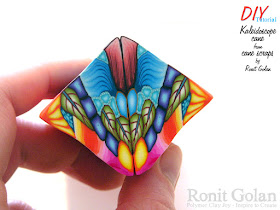
Do you have some canes scraps just laying around and you're looking for some inspiration and ideas? This DIY Tutorial will assist you in this process, so.. lets start!
All you need is: Assortment of leftover canes / canes scraps, a blade and a ruler.
Sometimes I like to sketch on a paper a triangle that will assist me to maintain the correct angle of the triangle cane. I prepare all my cane and lengthen them to the same length before I start to assemble them.
While assembling the canes, think about the 3 sides, in the final cane they will be join together and will create a new pattern.
After this step it is time to reduce the triangle to a long triangular prism shape; my TIP for you is to be patience and lengthen this shape with a lot of attention until it is long enough for you to cut it in two.
BUT before cutting this cane into two parts, it is very important to "clean" the 2 sides, until both of them are the same, as shown in this pic:
Now cut the cane into two parts and attached them together. Find the right arrangement that appeal to you the most. The shape I have now is a rhombus shaped cane and I want to squeeze it to a triangle shape.
I do that by pressing one of the angles inside, like in this pic.
Then I cut it into 2 pieces and assemble them to a square shaped cane.
After reducing that cane, I cut it into 4 pieces and assemble them to a square cane too, and try to find the best combination for a great result...
...sometimes I cannot decide which is best ;-)
If you've enjoyed this tutorial, please check this post for more inspiration.
Enjoy Creating!


Thanks Ronit! You are kind to share your technique.
ReplyDeleteThank you Laura :) enjoy creating!!!
DeleteToda raba, Ronit! (I do not have Hebrew keyboard on this tablet.) These tutos are just what I have been looking for - and no charge.
ReplyDeleteThank you very much Jill :)
DeleteLOL!! Enjoy Creating :D
Great tutorial. Thank you so much! I am a learner still but love to see what is possible:-). Hugs, Carol
DeleteThank you very much Carol :) enjoy creating !!! :D
DeleteBeautiful and Thank You
ReplyDeleteThank you very much, enjoy creating 😊
Delete