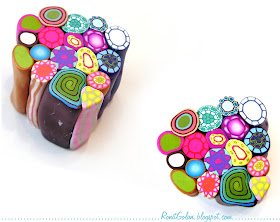
In this DIY tutorial I present a simple and easy
kaleidoscope canning technique from your own leftover canes, Let's start!
You will need:
Assortment of leftover canes (5-20 canes)
Blade
Ruler
1. Select and gather your leftover canes; all sorts of canes, they can be also small ones. I recommend adding canes with lighter and darker shades, which will enhance the contrast on the kaleidoscope final design.
The number of canes can be varied but try to use at least 5 canes. In this tutorial I've used 19 solid polymer clay canes.
2. At the end of this stage every cane should be 5-6.5 cm // 2- 2.5 inch long.
Start by reducing and rolling each cane just a bit longer
from the length you want, and then cut the edges of each cane ends, so its
pattern design is equal in both sides. Continue to lengthen the canes to your predetermined
length.
3. Gather all the canes to a triangle shape but it doesn't
have to be a perfect triangle.
How to decide where to put each cane? Lighter canes, darker
cane or special canes that you like - add them to the 3 corners of your
triangle design.
* Design Tip *
Remember that the canes that are in the 3 corners and the sides will be multiplied after the cane is done, so they will be more enhanced and noticeable in the kaleidoscope final design.
4. Choose the 3 triangle corners, and press each corner from side to the opposite side - from the beginning to the end of the cane, although it is short. In this stage pay attention that when you press the corner on one side - press the same corner on the opposite side of the triangle cane. Note that the 3 sides of the triangle pattern should be equal.
5. Press and lengthen to reduce the triangle cane up to at
least 15- 20 cm
// 6-8 inch
including the ends. Press each corner to all of its length; after pressing every
corner, turn the cane over so the reducing will be even on each side.
After the cane is lengthened, cut the ends on both sides, so the pattern you get is totally the same on both sides of the cane.
6. Cut the cane exactly in the middle and assemble the 2
parts to a square shape. Be sure that you join it perfectly, from start to
finish.
You might get at the beginning a rhombus kind of shape, so
press the corners of the cane to all of its length until you get a square
shaped cane. Reduce the cane until the size of the square is the size of the slices
that you need.
And you are done!
7. Every 4 pieces from the kaleidoscope will create an unexpected,
impressive and exiting look; here's an example:
8. From this kaleidoscope cane I've made a surface and created
some beads and a Hamsa for a wall decor ornament.
I will be happy to see your kaleidoscope from leftover
canes, please send me your images to mail: ronna123@walla.co.il
and I will post them here if you like.
If you have any questions about this tut, please leave that
in your comment and I will gladly answer and assist :-)
Enjoy Creating !!!


This is my favourite technique, too :) This is a very good tutorial :)
ReplyDeleteThank you very much Monique :))) enjoy!
DeletePrecioso!!! muchas gracias por el tutorial. Besos
ReplyDeleteMuchas gracias Mª Reyes:))) disfrutar!
DeleteThank you for the great tutorial. So many get so technical and yours was very easy to follow. ☺
ReplyDeleteThank you so much !!! :D
Deletewow so cool. Thanks for taking the time. The pics were great.
ReplyDeleteThank you so much Connie :)
DeleteThank you for your excellent instructions and pictures. I made my first kaleidoscope cane after reviewing your site. I made miniature bowls for dollhouses (simply cut out small circles and formed the bowls over the end of a pencil eraser)and to share with my friends who make miniature items for dollhouses. Thank you again for your kindness!
ReplyDeleteThank you very much GMom5 :))
DeleteI love miniatures and I'm sure the plates are gorgeous!
Enjoy creating!!
Thank you very much Doxielover, enjoy creating :)
ReplyDeleteBeautiful work of art
ReplyDeleteThank you very much!! :)
DeleteI have to say making this cane is so satisfying, truly, that I think I enjoy it more then making jewelry or other items from it. Very relaxing !
ReplyDeleteThank you very much, enjoy creating!! 💖
Delete